Wednesday, September 26, 2012

Dollar store hanging frame!


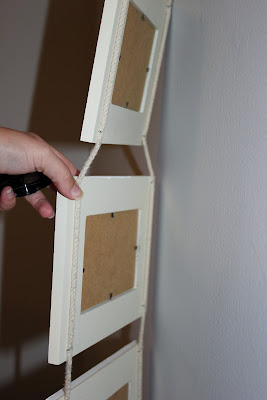
This is a hanging frame made from 3 dollar store frames, some paint, a piece of rope and a staple gun! Simply take the frames, remove the back "kick stand" and paint them-- I used white (mine were wooden so they would take the paint better-- if you get plastic ones, make sure to get a crafting paint that works with plastic. I just used acrylic for the wood).

You can't really tell here, but the frames had wooden "planks" running horizontally, so I distressed them a little to get a beachy feel. I just used some sandpaper!


After the frames are dry, lay the rope (or twine, or ribbon) along the backs of them. Start at the bottom with one loose end, and loop the top as you come back down the other side. Trim to fit. 


Measure the space in between the frames so you get them even. Glue or staple the rope or ribbon onto the back of the frame.

I used coordinating pictures of my daughter-- taken at different times, but all with a grassy background for continuity!


Ceramic memories!

One of my favorite things to do is to paint my own ceramic pieces. I do most of mine at a summer camp we go to as a family each year (yay Camp Michigania!) but I know there are lots of local places that allow you to paint your own ceramic pieces! My local ceramics go-to is called Creative Arts Studio in Royal Oak, MI. I love the different basic pieces that they have to offer- the possibilities are endless!

Here are just a few of the projects that I have done that may inspire you:
This is an idea I came up with last year-- make a small (think dessert) plate every year with a few representations of your child's favorite things at the time. When my daughter was 14 months old, she loved balloons, the color blue and ladybugs! It's a fun keepsake, and useful too! Give them to your child when they graduate or get married- they will love the stories that go along with them!


This is my pear plate-- done with underglazes on a plain white salad sized plate. Not all projects have to be useful- this one just sits and looks pretty!


I wanted to commemorate our family's trip to Greece, so I painted my kitchen a dark blue to contrast with the white cabinets. I loved the Greek look, so I made a plate to match!

This mug was fun- we have a navy blue and white paisley couch that was the inspiration!


Our master bedroom is teal and brown- but I couldn't find a light switch cover that matched, so I made one! It took less than an hour to paint, and it really stands out in the room!

Monday, September 24, 2012

Fabric Flowers


I was looking for a valance or some kind of decoration for my daughter's nursery window. I already had the blinds, so I wanted something to dress it up! Fabric flowers turned out to be just what I was looking for!

I took several coordinating (but not too matchy-matchy) fabrics-- I used thin, value fabric from Joann's-- at $2-$4 per yard, you can't go wrong! Start with about a yard of each. Then, I used iron-on interfacing (also purchased at Joann Fabrics) to stiffen the fabric. I ironed it on to the backs of the square fabric pieces. I cut 5 petals of each pattern out of the now stiffened fabric. For the smaller layered flowers I didn't cut individual petals, just a wavy flower shape.

After I had all my flowers/petals cut out, I grouped the 5 petals of the same pattern and made a small fold in the center of the flat end of the petal. I hot glued the tucks so that they would stay, and I didn't have to wait for the glue to dry. This added a nice dimension to my final flower! After my petals were tucked and glued, I simply layered the smaller flower shapes on top of the larger petals and fabric glued the different layers on top of one another.

For a center decoration, I glued on loose beads, or I used buttons with raffia woven through them for a textured and 3-D look. That's it! I used plain tape (pretty primitive) to put them up around my daughter's window frame, and I had enough extra to decorate the outside of her door, plus a few over the changing table! You could use wall adhesive, or a 3M Command removable tack up strip as well. I have cut the "removable sticky poster tabs" into smaller pieces before, and it has held beautifully. 

They really give her room a sweetness, and since they are so light, if one fell, it wouldn't hurt anyone :) I love how customizable they are-- they would make a great baby gift! Or, use the idea to do butterflies, letters, etc for an older girl's room!

Saturday, September 22, 2012

Bathroom mirror makeover using scrapbook rub-ons!


I found an old, gold plated wooden frame at a thrift store. I put painting tape around the perimeter of the mirror itself, so I wouldn't get paint on it, and painted it with high gloss off white.  I used a very fine sandpaper to distress the paint (when it was dry) until it had the "vintage" look I was going for. Then, I used white paisley rub-ons (typically used in scrapbooking, they can be found very inexpensively at any craft store-- you can buy quotes, pictures, designs, letters, etc) to decorate the corners. I just placed the rub on directly onto the mirror, and rubbed it off of the backing with a popsicle stick. I used one in each corner and I think it completed the look!
Imagine what you can do with rub-ons and mirrors-- inspirational quotes, monograms, etc! Easily removable with rubbing alcohol. I've had these rub-ons on this particular mirror for 4 years now, and they still look as good as new!

Friday, September 21, 2012

I see the moon, and the moon sees me....


I looked and looked and LOOKED for something to put over my daughter's crib and just couldn't find anything I liked! One night we were reading "The Moon Shines Down" by Margret Brown and it hit me-- I loved the phrase, "I see the moon, and the moon sees me. God bless the moon, and God bless me". I decided I could make my own wall mural using that quote.
I used the Cricut Alphabet font with my Cricut Expression machine, and cut the words out of white vinyl. I used a 3" letter height. I used the "&" and lowercase letters for a more whimsical look. I didn't worry about getting everything straight- in fact, I tried to make it look dream-like! It really took the pressure off :)
I used regular acrylic paint in 3 shades of yellow + white to paint the moon and stars. I like the way it turned out-- hopefully you do too!

Cricut Cut-Out Card


I  love the simplicity of these cut-out cards. For these cards I used pre-folded, solid color 5X7 cards. I flattened the card and put it on the Cricut mat and cut out the image. As you can see, my little fairy didn't quite make it to the center, but I almost like it better that way!! You could also make your own cards from total scratch by using patterned or solid scrapbook paper and cutting your image first, and folding afterwards.  Initials would make cute stationary! Such a simple way to dress up a card!   

Rock Painting

Rock painting... it doesn't get much easier! Play around with letters, quotes, and pictures! This is my daughter Evelyn's door stopper in her room!
Source: via Emma on Pinterest